
はじめに
今回はgo_routerを用いたルーティングの実装方法について解説していきます。
go_routerの解説に入る前にまずはルーティングの説明から入ります。
ルーティングとは
アプリケーション内の画面(ページ)間の移動を管理する方法のことです。(画面遷移)
Navigatorというルーティングを管理するウィジェットがあり、Route(ルート)で各画面のパスなどを指定し、画面をpush、popさせることができます。
また、Flutter2よりブラウザと連携する新たなAPIが提供されました。これらの機能が追加されたものをNavigator2.0と呼ばれます。
Navigator2.0からはRouterウィジェットやPageクラスが追加されています。
これにより従来の「画面を一つずつ積み上げる方式(push、pop)」に加え、「履歴を一度に書き換える」事が可能になりました。
今回は「履歴を一度に書き換える」実装を行なっていきます。
go_routerとは
簡単に言うとルーティングを使いやすくするためのパッケージです。
(パスと画面の組み合わせを決める)
先述のNavigetor2.0から追加されたRouterウィジェットを使いやすくする目的で使用します。
基本的にNavigetor2.0ではgo_routerを使用する事が多いようです。
使用環境
MacBookAir: Apple M1
macOS: 14.5
Flutter バージョン: 3.16.0
VS Code バージョン: 1.90.2
実装
ルート設定の理解を深める為に以下2つの例を実装していきます。
1.popが失敗する例
2.popが機能している例
1.popが失敗する例
<サンプルコード(一部抜粋)>
- 遷移処理【go_router_screen.dart】
- ルート設定【can_not_pop_router.dart】
class GoRouterFirstScreen extends StatelessWidget {
const GoRouterFirstScreen({super.key});
// 本画面のルートパス
static const routePath = '/';
@override
Widget build(BuildContext context) {
return Scaffold(
appBar: AppBar(
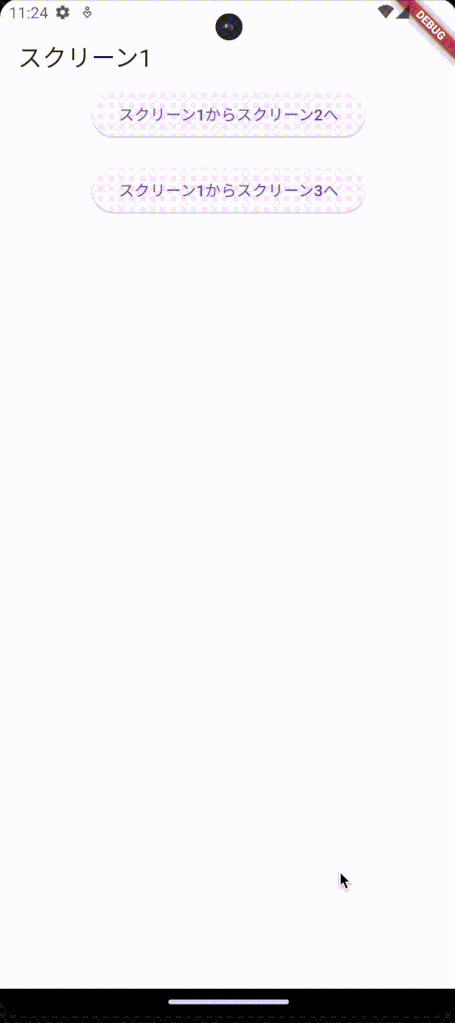
title: const Text('スクリーン1'),
automaticallyImplyLeading: true,
),
body: Center(
child: Column(
children: [
ElevatedButton(
onPressed: () {
// canNotPopRouterで使用
GoRouter.of(context).go('/GoRouterSecondScreen');
},
child: const Text('スクリーン1からスクリーン2へ'),
),
const SizedBox(
height: 20,
),
ElevatedButton(
onPressed: () {
// canNotPopRouterで使用
GoRouter.of(context).go('/GoRouterSecondScreen/GoRouterThirdScreen');
},
child: const Text('スクリーン1からスクリーン3へ'),
),
],
)
),
);
}
}
class GoRouterSecondScreen extends StatelessWidget {
const GoRouterSecondScreen({super.key});
// 本画面のルートパス
static const routePath = 'GoRouterSecondScreen';
@override
Widget build(BuildContext context) {
return Scaffold(
appBar: AppBar(
title: const Text('スクリーン2'),
automaticallyImplyLeading: true,
),
body: Center(
child: Column(
children: [
ElevatedButton(
onPressed: () {
// canNotPopRouterで使用
GoRouter.of(context).go('/GoRouterThirdScreen');
},
child: const Text('スクリーン2からスクリーン3へ'),
),
const SizedBox(
height: 20,
),
ElevatedButton(
onPressed: () {
// canNotPopRouterで使用
Navigator.of(context).pop();
},
child: const Text('戻るボタン'),
),
],
)
),
);
}
}
class GoRouterThirdScreen extends StatelessWidget {
const GoRouterThirdScreen({super.key});
// 本画面のルートパス
static const routePath = 'GoRouterThirdScreen';
@override
Widget build(BuildContext context) {
return Scaffold(
appBar: AppBar(
title: const Text('スクリーン3'),
automaticallyImplyLeading: true,
),
body: Center(
child: Column(
children: [
ElevatedButton(
onPressed: () {
// canNotPopRouterで使用
Navigator.of(context).pop();
},
child: const Text('戻るボタン'),
),
],
)
),
);
}
}final canNotPopRouter = GoRouter(
routes: [
GoRoute(
path: '/',
builder: (context, state) => const GoRouterFirstScreen(),
),
GoRoute(
path: '/GoRouterSecondScreen',
builder: (context, state) => const GoRouterSecondScreen(),
),
GoRoute(
path: '/GoRouterThirdScreen',
builder: (context, state) => const GoRouterThirdScreen(),
),
]
);2.popが機能している例
<サンプルコード(一部抜粋)>
- 遷移処理【go_router_screen.dart】
- ルート設定【can_pop_router.dart】
class GoRouterFirstScreen extends StatelessWidget {
const GoRouterFirstScreen({super.key});
// 本画面のルートパス
static const routePath = '/';
@override
Widget build(BuildContext context) {
return Scaffold(
appBar: AppBar(
title: const Text('スクリーン1'),
automaticallyImplyLeading: true,
),
body: Center(
child: Column(
children: [
ElevatedButton(
onPressed: () {
// canPopRouterで使用
GoRouter.of(context).go('${GoRouterFirstScreen.routePath}${GoRouterSecondScreen.routePath}');
},
child: const Text('スクリーン1からスクリーン2へ'),
),
const SizedBox(
height: 20,
),
ElevatedButton(
onPressed: () {
// canPopRouterで使用
GoRouter.of(context).go('${GoRouterFirstScreen.routePath}${GoRouterSecondScreen.routePath}/${GoRouterThirdScreen.routePath}');
},
child: const Text('スクリーン1からスクリーン3へ'),
),
],
)
),
);
}
}
class GoRouterSecondScreen extends StatelessWidget {
const GoRouterSecondScreen({super.key});
// 本画面のルートパス
static const routePath = 'GoRouterSecondScreen';
@override
Widget build(BuildContext context) {
return Scaffold(
appBar: AppBar(
title: const Text('スクリーン2'),
automaticallyImplyLeading: true,
),
body: Center(
child: Column(
children: [
ElevatedButton(
onPressed: () {
// canPopRouterで使用
GoRouter.of(context).go('${GoRouterFirstScreen.routePath}${GoRouterSecondScreen.routePath}/${GoRouterThirdScreen.routePath}');
},
child: const Text('スクリーン2からスクリーン3へ'),
),
const SizedBox(
height: 20,
),
ElevatedButton(
onPressed: () {
// canPopRouterで使用
GoRouter.of(context).pop();
},
child: const Text('戻るボタン'),
),
],
)
),
);
}
}
class GoRouterThirdScreen extends StatelessWidget {
const GoRouterThirdScreen({super.key});
// 本画面のルートパス
static const routePath = 'GoRouterThirdScreen';
@override
Widget build(BuildContext context) {
return Scaffold(
appBar: AppBar(
title: const Text('スクリーン3'),
automaticallyImplyLeading: true,
),
body: Center(
child: Column(
children: [
ElevatedButton(
onPressed: () {
// canPopRouterで使用
GoRouter.of(context).pop();
},
child: const Text('戻るボタン'),
),
],
)
),
);
}
}final canPopRouter = GoRouter(
routes: [
GoRoute(
path: GoRouterFirstScreen.routePath,
builder: (context, state) => const GoRouterFirstScreen(),
routes: [
GoRoute(
path: GoRouterSecondScreen.routePath,
builder: (context, state) => const GoRouterSecondScreen(),
routes: [
GoRoute(
path: GoRouterThirdScreen.routePath,
builder: (context, state) => const GoRouterThirdScreen(),
),
]
),
]
),
]
);解説
popが失敗する例
GoRouterSecondScreenに遷移後、戻るボタンを押すと期待通りの結果になりません。
スタックが空になってしまい、遷移先の画面が表示されていません。

GoRouter.of(context).goを指定すると、現在のページをスタックから削除して、新しいページをスタックに追加する為です。
図に表してみます
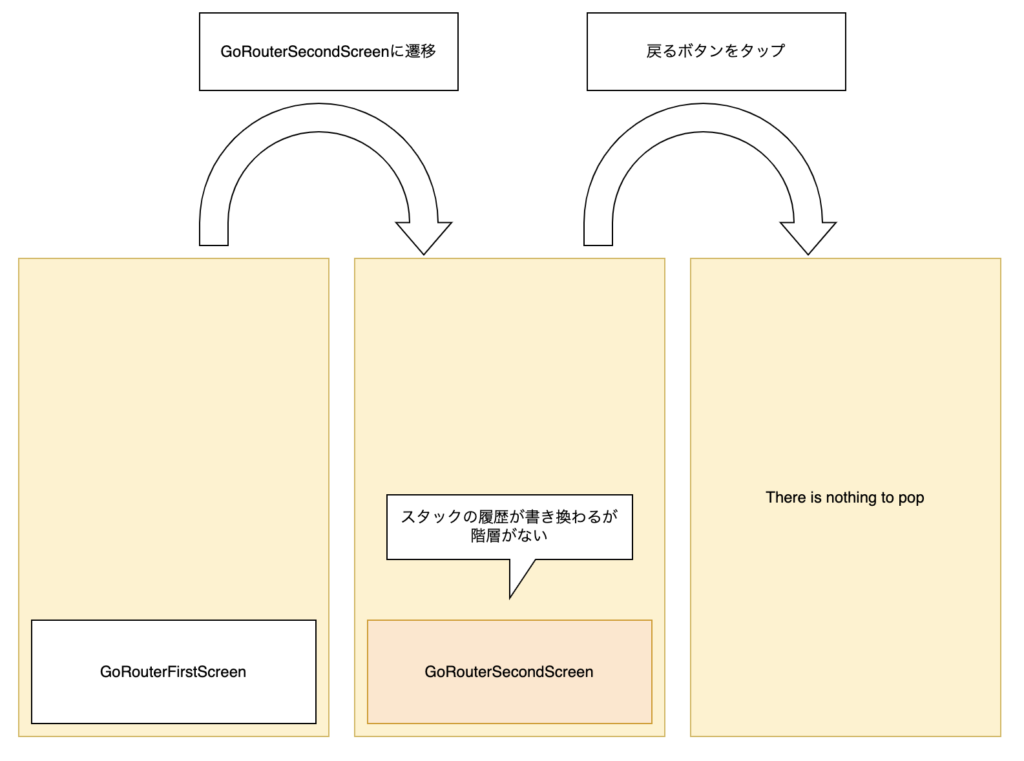
期待通りの結果にするには、戻るボタンを押した時にスタックを空にしないようにする必要があります。
スタックを空にしないようにするには、戻るページ(GoRouterFirstScreen)を遷移先(GoRouterSecondScreen)のページの下に置いてあげる必要があります。
popが機能している例
GoRouteを入れ子にすると先ほどの不具合が解消されます。
入れ子構造がそのまま画面スタックに再現される為です。
GoRoute = 遷移先のパスやPageクラスの生成方法を保持するクラス
- popが失敗する例
- popが機能している例
final canNotPopRouter = GoRouter(
  routes: [
    GoRoute(
      path: '/',
      builder: (context, state) => const GoRouterFirstScreen(),
    ),
    GoRoute(
      path: '/GoRouterSecondScreen',
      builder: (context, state) => const GoRouterSecondScreen(),
    ),
    GoRoute(
      path: '/GoRouterThirdScreen',
      builder: (context, state) => const GoRouterThirdScreen(),
    ),
  ]
);final canPopRouter = GoRouter(
routes: [
GoRoute(
path: '/',
builder: (context, state) => const GoRouterFirstScreen(),
routes: [
GoRoute(
path: '/GoRouterSecondScreen',
builder: (context, state) => const GoRouterSecondScreen(),
routes: [
GoRoute(
path: '/GoRouterThirdScreen',
builder: (context, state) => const GoRouterThirdScreen(),
),
]
),
]
),
]
);図で表すとこうなります
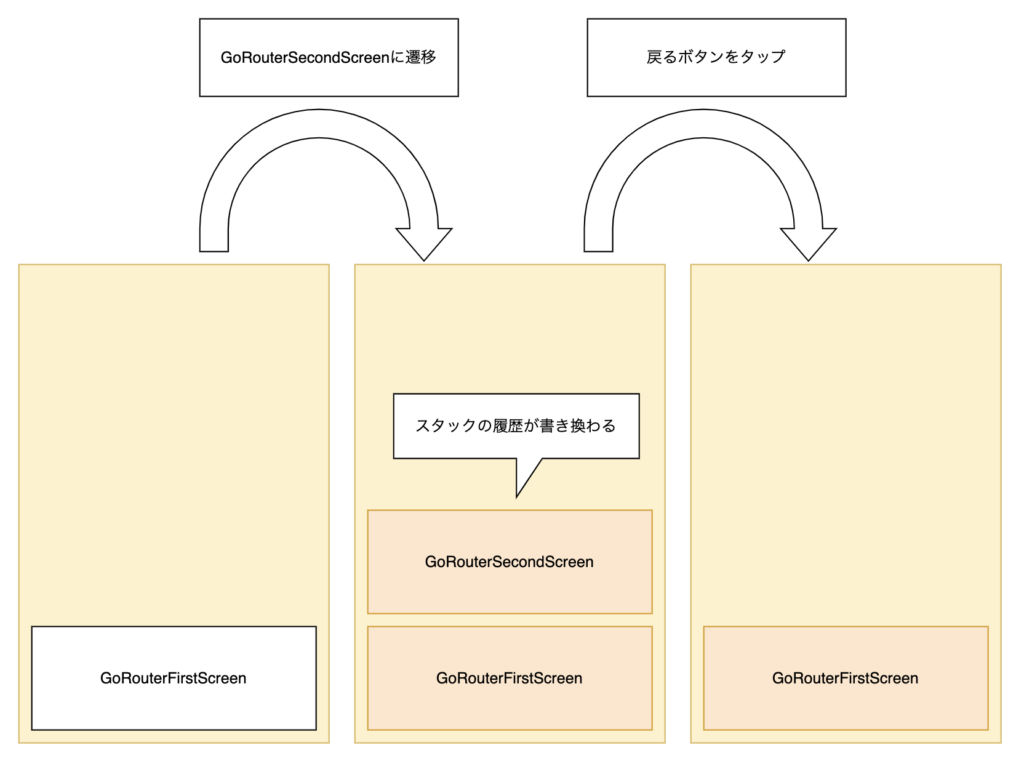
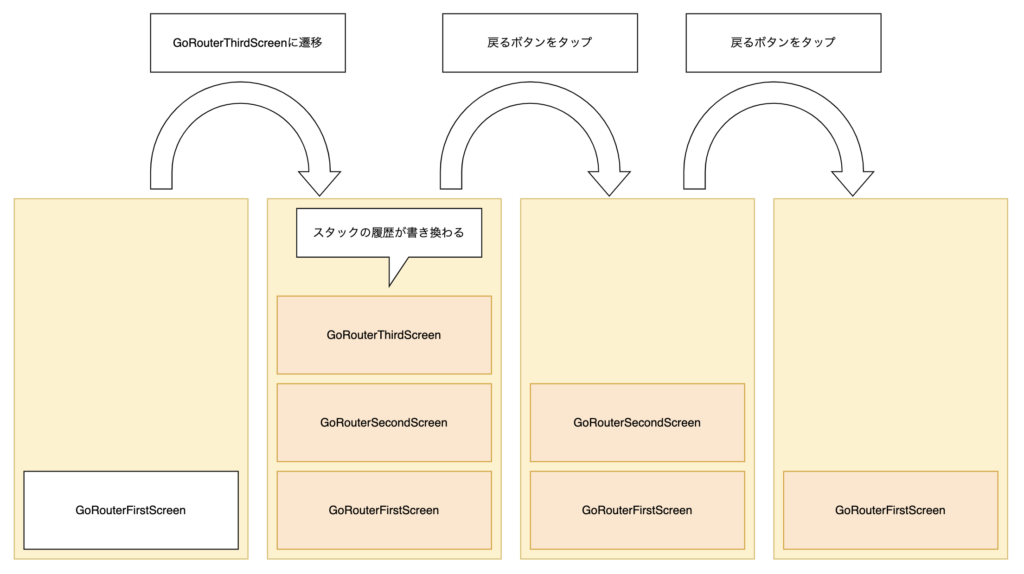
ちなみに今回の実装ではスタックの履歴を一度に書き換えるので、それ以前のスタックは残りません。
スタックを積み上げるのではなく、丸ごと書き換えるイメージです。
全体のコードが見たい方は以下に記載
<参考コード>

まとめ
go_routerとは
- 画面遷移に必要なルーティングを使いやすくしたパッケージ
go_routerでできること
- GoRouteを入れ子にすることでスタックの履歴を書き換えることが可能
- 従来の「画面を一つずつ積み上げる方式(push、pop)」に加え、「履歴を一度に書き換える」事が可能になった(Navigator2.0)
いかがだったでしょうか?
ご意見、ご感想ありましたらお気軽にコメントしてください。
【参考文献】


コメント
go_routerを使ったルーティングの実装は、Flutterアプリケーション設計において非常に重要ですね。従来のpush/pop方式に加えて、履歴を一度に書き換える方法が使えるのは便利です。特にNavigator 2.0との連携がスムーズで、柔軟な画面遷移が実現できます。入れ子構造のGoRouteを使うことで、画面スタックの管理も直感的になりました。今回の実装例では、どのような場面で履歴の一括書き換えが有効だと感じましたか?
The website design looks great—clean, user-friendly, and visually appealing! It definitely has the potential to attract more visitors. Maybe adding even more engaging content (like interactive posts, videos, or expert insights) could take it to the next level. Keep up the good work!